[React Native] Header
Nadan Dev Blog
Header
크게 세 가지 옵션이 있음
- navigation header
- 외부 모듈 header - react native element
- 직접 만든 header
Navigation Header
stack navigator로 navigation을 만들면 default로 제공되는 header가 있음.
● React Navigation Header 문서
● 기본 동작 방식
- 기본적으로 navigationOptions으로 동작함
- headerRight: () ⇒ {} 이렇게 하려면 {}안에서 return 해줘야 함
- headerRight: () => {} 이렇게 ()를 리턴하는 애가 있고 headerRightContainerStyle: { 이렇게 {}를 리턴하는 애가 있음
● 헤더 아이콘 배치
헤더 아이콘 배치 조절하는 방법은 2가지 있음
- width를 정하고 justifyContent 설정
- headerRightContainerStyle 설정
● 뒤로가기 버튼(back button label)
뒤로 가기가 default로 navigation name으로 되는 듯. headerBackTitle: ”로 혼내주자
● 유의점
-
SafeArea가 있으면 Customer 헤더 사용할 때 이상한 공간이 생김
Unnecessary space from the top of the header rendered using react navigation
-
BottomTabNavigator 사용하면 탭을 옮길 때 헤더에 glitch가 생김
BottomTabNavigato을 사용하면 각 탭 화면에 헤더가 없음. 헤더를 넣으려면 stackNavigator를 각각 넣어줘야 하는데 그 이후 탭을 누르면 헤더가 툭툭 튀는 느낌이 있음. 해결은 못하고 헤더를 없애고 react-native-element의 헤더로 대체함
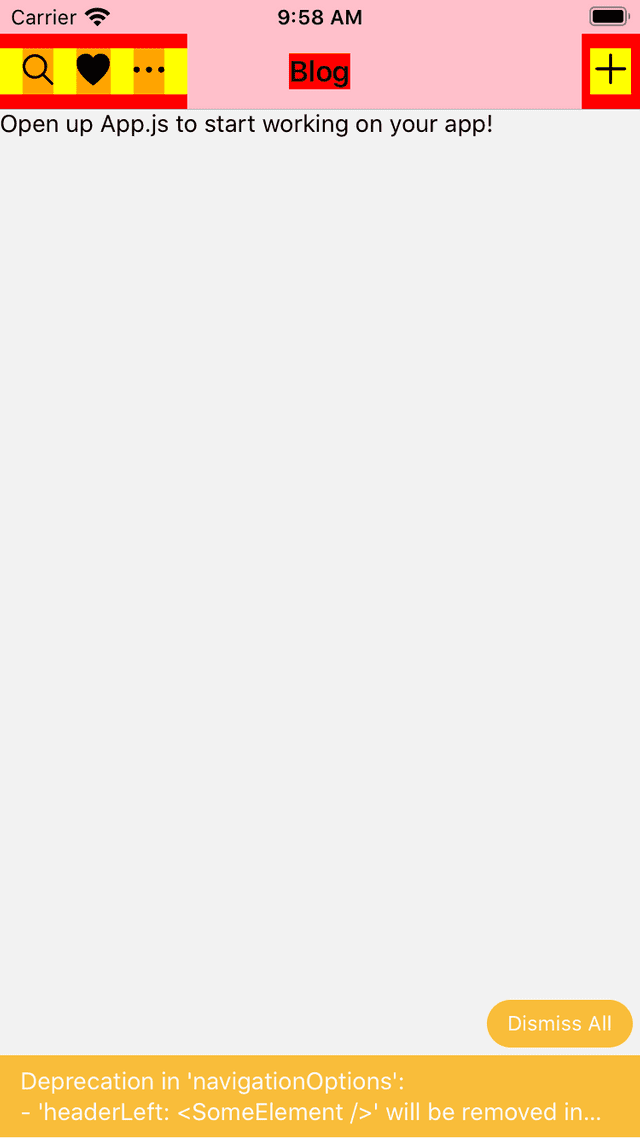
● 동작 이해
import React from 'react';
import { Platform, StyleSheet, Text, View, TouchableOpacity } from 'react-native';
import { AntDesign } from '@expo/vector-icons';

import { Icon } from "react-native-elements";


const ListScreen = () => {
  return (
    <View>
      <Text>Open up App.js to start working on your app!</Text>
    </View>
  );
};

ListScreen.navigationOptions = () => {
  return {
    headerStyle: {
      backgroundColor: 'pink',
    },
    headerTitleContainerStyle: {
      backgroundColor: 'red', // THIS RIGHT HERE
    },
    headerLeftContainerStyle: {
      backgroundColor: 'red'
    },
    headerRightContainerStyle: {
      backgroundColor: 'red',
      padding: 5
    },
    headerRight: (
      <View style={styles.iconRightContainer}>
        <AntDesign name="plus" size={24} color="black" />
      </View>
    ),
    headerLeft: (
      <View style={styles.iconLeftContainer}>
        <Icon style={{ backgroundColor: 'orange' }} type="ionicon" name={Platform.OS === "ios" ? "ios-search" : "md-search"} />
        <Icon style={{ backgroundColor: 'orange' }} type="ionicon" name={Platform.OS === "ios" ? "ios-heart" : "md-heart"} />
        <Icon style={{ backgroundColor: 'orange' }} type="ionicon" name={Platform.OS === "ios" ? "ios-more" : "md-more"} />
      </View>
    )
  };
};

const styles = StyleSheet.create({
  icon: {
    paddingLeft: 10
  },
  iconLeftContainer: {
    backgroundColor: 'yellow',
    flexDirection: "row",
    justifyContent: "space-evenly",
    width: 110
  },
  iconRightContainer: {
    backgroundColor: 'yellow',
    flexDirection: "row",
    justifyContent: "space-evenly",
  }
});

export default ListScreen;
● 사용 예)
-> 변경
IndexScreen.navigationOptions = ({ navigation }) => {
    return {
        headerRight: () =>
            <TouchableOpacity onPress={() => navigation.navigate('Create')}>
                <Feather name="plus" size={30} />
            </TouchableOpacity>

    }
}SignUpScreen.navigationOptions = () => {
return {
headerShown: false
};
}